Are you looking for a unique and personalized way to display your cherished memories? Look no further! With the advancement of technology, creating a customized calendar with your own photos has never been easier. Imagine being able to look at your calendar every day and see the precious moments you’ve captured with your loved ones. In this article, we’ll guide you through the steps to create a personalized calendar that you can treasure for years to come. So, let’s get started and learn how to make a calendar that’s truly yours!
Choose the Right Photos for Your Calendar
Factors to Consider When Selecting Photos
When it comes to choosing the right photos for your personalized calendar, there are several factors to consider. Here are some tips to help you make the best selection:
- Theme: Choose photos that reflect the theme or mood you want to convey for each month. For example, if you want a calendar that celebrates the beauty of nature, choose photos of flowers, trees, and landscapes.
- Color scheme: Consider the color scheme of your calendar when selecting photos. Choose photos that complement the colors of your calendar or that can be easily edited to match the design.
- Quality: Make sure the photos you choose are of high quality and resolution. This will ensure that they look great when printed and that the details are sharp and clear.
- Lighting: Good lighting is essential for great photos. Choose photos that have good lighting, either natural or artificial. This will help ensure that the photos look vibrant and alive.
- Subject matter: Think about the subject matter of the photos you choose. Are you looking for photos of people, places, or things? Consider the context of the photos and how they will fit into your calendar design.
- Personal significance: Choose photos that have personal significance to you. This could be photos of family members, friends, or special moments that you want to commemorate throughout the year.
By considering these factors, you can choose photos that not only look great in your calendar but also have personal meaning to you.
Tips for Taking Great Photos for Your Calendar
Taking great photos for your personalized calendar requires some planning and creativity. Here are some tips to help you capture the perfect shots:
Lighting
Proper lighting is crucial for taking great photos. Choose a location with ample natural light or use artificial lighting to create the desired effect. Experiment with different lighting setups to find the best one for your shot.
Composition
Composition is key to creating visually appealing photos. Consider the rule of thirds, leading lines, and negative space when composing your shots. Experiment with different angles and perspectives to find the most interesting and dynamic composition.
Focus
Make sure your subject is in focus. Use a shallow depth of field to create a blurred background and draw attention to your subject. Use manual focus or adjust your aperture to achieve the desired effect.
Color
Pay attention to color when taking photos for your calendar. Consider the colors of your subject and the background and choose a color scheme that complements them. Experiment with contrasting colors or monochromatic schemes to create visually appealing images.
Time of Day
Choose the right time of day to take your photos. Golden hour light is soft and warm, making it ideal for portraits and landscapes. Overcast days can also provide good lighting for outdoor photos. Experiment with different times of day to find the best light for your shots.
By following these tips, you can take great photos for your personalized calendar that will showcase your favorite memories and moments all year round.
Find a Calendar Maker that Supports Custom Photos
Key Features to Look for in a Calendar Maker
When searching for a calendar maker that supports custom photos, there are several key features to look for. These features will ensure that the calendar maker is user-friendly, customizable, and efficient. Here are some of the most important features to consider:
- Drag-and-Drop Interface: A drag-and-drop interface allows you to easily add and arrange your photos on the calendar. This feature makes it simple to create a unique and personalized design for your calendar.
- Multiple Layout Options: A calendar maker with multiple layout options will give you the flexibility to create a calendar that fits your style and needs. Look for a calendar maker that offers various layouts, such as grid, monthly, and yearly views.
- Photo Editing Tools: Some calendar makers offer built-in photo editing tools that allow you to enhance your photos before adding them to your calendar. Look for features like cropping, resizing, and filtering to make your photos look their best.
- Customizable Text Boxes: Customizable text boxes allow you to add captions, dates, and other text to your calendar. Look for a calendar maker that offers a variety of font styles and sizes to help you create a unique and personalized design.
- Printing and Sharing Options: A calendar maker with printing and sharing options will make it easy for you to share your personalized calendar with friends and family or print it out for display in your home or office. Look for a calendar maker that offers high-quality printing options and the ability to share your calendar via email or social media.
By considering these key features when choosing a calendar maker, you can ensure that you find a tool that will help you create a personalized calendar that reflects your style and preferences.
Popular Calendar Makers that Allow Custom Photos
When it comes to creating a personalized calendar with your own photos, you need a calendar maker that supports custom images. Here are some popular calendar makers that allow you to use your own photos:
- Google Calendar: Google Calendar is a free calendar maker that allows you to add custom photos to your calendar. You can easily upload your own photos and use them as background images for your calendar. Google Calendar also has a range of customization options, including different layouts and fonts, to help you create a unique and personalized calendar.
- Apple Calendar: Apple Calendar is another popular calendar maker that supports custom photos. You can easily add your own photos to your calendar and use them as background images. Apple Calendar also has a range of customization options, including different color schemes and fonts, to help you create a personalized calendar that suits your style.
- Microsoft Outlook: Microsoft Outlook is a powerful email client that also has a calendar feature. You can use Microsoft Outlook to create a personalized calendar with your own photos. You can upload your own photos and use them as background images for your calendar. Microsoft Outlook also has a range of customization options, including different layouts and fonts, to help you create a unique and personalized calendar.
- Adobe Photoshop: If you’re a Photoshop user, you can use the software to create your own custom calendar. You can design your own calendar layout, add your own photos, and customize the fonts and colors to create a personalized calendar that suits your style. Photoshop also allows you to export your calendar in different formats, including PDF and JPEG, so you can easily print it out or share it with others.
Overall, there are many different calendar makers that allow you to use your own photos to create a personalized calendar. Whether you prefer Google Calendar, Apple Calendar, Microsoft Outlook, or Adobe Photoshop, there are plenty of options available to help you create a unique and personalized calendar that reflects your style and interests.
Design Your Calendar
Basic Design Principles for a Personalized Calendar
Creating a personalized calendar with your own photos requires careful consideration of several design principles to ensure that the final product is visually appealing and functional. Here are some basic design principles to keep in mind when designing your personalized calendar:
- Balance: Balance is essential in any design, and a personalized calendar is no exception. You should aim to achieve balance between the different elements of your calendar, such as the photos, text, and borders. Consider using symmetrical or asymmetrical balance to create a visually pleasing layout.
- Contrast: Contrast is another important design principle that can help make your personalized calendar more visually appealing. You can use contrast in various ways, such as contrasting colors, textures, or sizes. For example, you can use a light background and dark text, or vice versa, to create contrast.
- Focus: It’s important to have a clear focus in your personalized calendar design. Decide which photo or image you want to highlight the most and use it as the focal point of your calendar. This will help guide the viewer’s eye and make your calendar more visually appealing.
- Consistency: Consistency is key in any design, and your personalized calendar is no exception. Make sure to use consistent colors, fonts, and styles throughout your calendar to create a cohesive look. This will help make your calendar look more professional and polished.
- Simplicity: While it’s important to add personal touches to your personalized calendar, it’s also important to keep things simple. Avoid cluttering your calendar with too many images or too much text. Instead, focus on the most important elements and keep your design clean and simple.
By following these basic design principles, you can create a personalized calendar that is visually appealing and functional.
Tools and Tips for Designing Your Calendar
Creating a personalized calendar with your own photos requires careful planning and attention to detail. The tools and tips listed below will help you design a calendar that reflects your unique style and preferences.
- Choose the Right Software: There are many software options available for creating personalized calendars, such as Adobe Photoshop, Canva, and Microsoft Publisher. Consider your skill level and the features you need before selecting a software program.
- Decide on the Layout: Consider the layout of your calendar, such as whether you want a portrait or landscape orientation. Think about the size of your calendar and how it will be displayed.
- Select Your Photos: Choose photos that reflect your personal style and that you want to remember throughout the year. Consider the lighting, composition, and subject matter of your photos.
- Choose Colors and Fonts: Consider the colors and fonts you want to use in your calendar. Choose colors that complement your photos and choose fonts that are easy to read.
- Add Text and Graphics: Consider adding text and graphics to your calendar, such as holidays and special events. Be sure to use clear and legible fonts and avoid cluttering your calendar with too much information.
- Save and Print: Once you have designed your calendar, save it and print it out. Consider using high-quality paper and a professional printer to ensure that your calendar looks its best.
By following these tools and tips, you can create a personalized calendar that reflects your unique style and preferences.
Customize Your Calendar with Your Own Photos
Uploading and Resizing Your Photos
When it comes to creating a personalized calendar with your own photos, one of the most important steps is uploading and resizing your images. This is because the quality of your photos will play a significant role in the final appearance of your calendar.
Here are some tips for uploading and resizing your photos:
- Make sure your photos are high-quality and well-lit. This will ensure that your images look crisp and clear when they are printed on your calendar.
- Use a photo editing software to resize your images. There are many free options available online, such as Pixlr or Canva, that allow you to easily resize your photos without losing quality.
- Use the right dimensions for your calendar. Most calendars are printed on standard sizes, such as 8.5 x 11 inches or A4 size. Make sure your images are the right size and aspect ratio for your calendar.
- Save your images in a high-quality format, such as JPEG or PNG. This will ensure that your images look sharp and clear when they are printed on your calendar.
By following these tips, you can ensure that your photos look great on your personalized calendar.
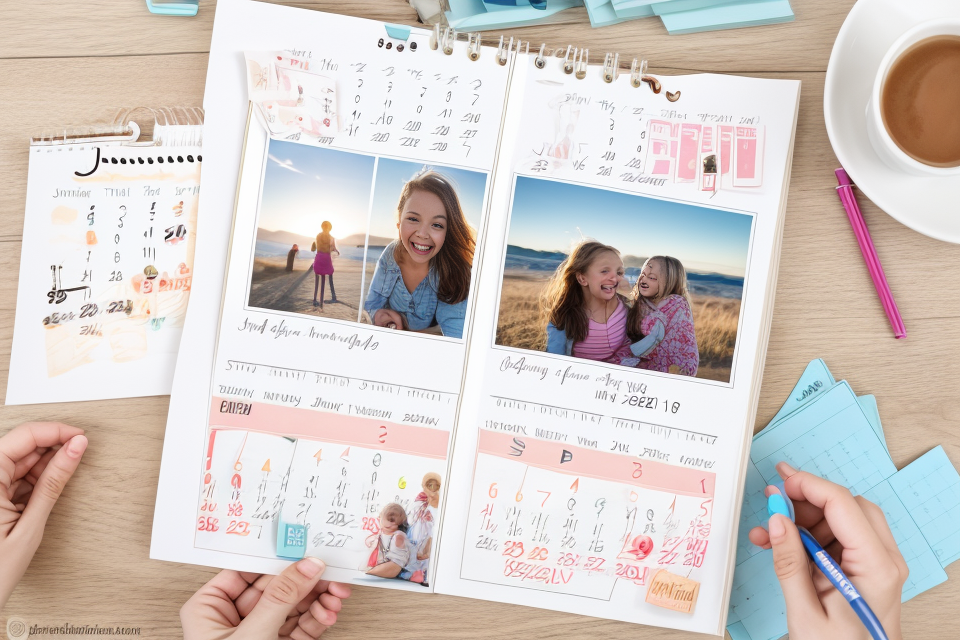
Arranging Your Photos on the Calendar
Arranging your photos on the calendar is an essential step in creating a personalized calendar. The way you arrange your photos can make a significant difference in the final outcome of your calendar. Here are some tips to help you arrange your photos on the calendar:
- Choose the right size for your photos: It’s important to choose the right size for your photos to ensure that they fit well on the calendar. If your photos are too small, they may appear blurry or pixelated when printed. On the other hand, if your photos are too large, they may take up too much space on the calendar, making it look cluttered.
- Group similar photos together: If you have a lot of photos to choose from, try grouping similar photos together. For example, if you have a lot of photos from a particular event, such as a wedding or a vacation, group them together on the calendar. This will help create a cohesive look and make it easier to find specific photos later on.
- Consider the layout: The layout of your calendar can also affect how your photos look. Consider using a grid layout or a diagonal layout to create a more visually appealing calendar. You can also experiment with different color schemes to create a cohesive look.
- Be creative: Don’t be afraid to get creative with your photo arrangement. Try using a mix of landscape and portrait orientation, or experiment with placing photos on the top, bottom, or sides of the calendar. This can help create a unique and personalized look for your calendar.
By following these tips, you can create a personalized calendar that showcases your favorite photos in a way that is both visually appealing and functional.
Print or Save Your Calendar
Printing Options for Your Personalized Calendar
When it comes to printing your personalized calendar, there are several options available to you. Here are some of the most popular printing options:
1. Home Printer
If you have a home printer, you can easily print your calendar using your own printer. This option allows you to print your calendar in the comfort of your own home, at your own convenience.
2. Online Printing Services
If you don’t have a home printer or prefer not to use your own printer, you can use an online printing service to print your calendar. There are many online printing services available that offer high-quality printing at affordable prices.
3. Professional Printing Services
If you want a high-quality, professional-looking calendar, you can use a professional printing service. These services offer a wide range of printing options, including different paper types, sizes, and finishes.
No matter which printing option you choose, make sure to select a high-quality printer and use good quality paper to ensure that your calendar looks professional and lasts for a long time.
Saving Your Calendar for Future Reference
Creating a personalized calendar with your own photos is a great way to keep track of important dates and events while also displaying your favorite memories. Once you have created your calendar, you may want to save it for future reference. There are several ways to do this, each with its own benefits and drawbacks.
Saving Your Calendar as a Printed Document
One option is to print out your calendar and keep it in a binder or on a corkboard. This allows you to easily flip through the pages and see all of your upcoming events at a glance. It also gives you the option to make changes or add new events by hand.
However, printing your calendar can be time-consuming and expensive, especially if you need to print multiple copies. Additionally, printed calendars can take up a lot of space and may not be as easy to update as a digital version.
Saving Your Calendar as a Digital File
Another option is to save your calendar as a digital file, such as a PDF or image file. This allows you to easily store your calendar on your computer or in the cloud, and access it from any device. You can also easily make changes or add new events by editing the file.
Saving your calendar as a digital file also has the benefit of being more environmentally friendly than printing it out. However, you may need to ensure that the file format you choose is compatible with any software or devices you plan to use in the future.
Saving Your Calendar in a Calendar App
If you prefer to use a digital calendar, you can save your personalized calendar in a calendar app such as Google Calendar or Apple Calendar. This allows you to easily access your calendar from any device and easily make changes or add new events.
Saving your calendar in a calendar app also has the benefit of automatically syncing with your other devices, so you always have access to the most up-to-date version of your calendar. However, you may need to ensure that the app you choose is compatible with any other calendars or scheduling tools you use.
In conclusion, there are several ways to save your personalized calendar for future reference, each with its own benefits and drawbacks. Whether you choose to print it out, save it as a digital file, or use a calendar app, be sure to choose the option that works best for your needs and preferences.
Frequently Asked Questions
Q: What software or tools do I need to create a personalized calendar with my own photos?
A: To create a personalized calendar with your own photos, you will need photo editing software such as Adobe Photoshop or Lightroom, as well as a calendar template or design software such as Microsoft Publisher or Canva.
Q: Can I use any type of photo for my personalized calendar?
A: Yes, you can use any type of photo for your personalized calendar, as long as the image is high-quality and print-ready. However, it’s important to keep in mind that certain photos may not print well or may be too small to fill the entire calendar page.
Q: How do I print my personalized calendar?
A: To print your personalized calendar, you will need to use a printing service or a printer that supports high-quality photo printing. It’s recommended to use glossy or luster paper for the best results. Additionally, make sure to select the correct paper size and orientation for your calendar layout.
Q: Can I save my personalized calendar as a digital file?
A: Yes, you can save your personalized calendar as a digital file in various formats such as PDF, JPEG, or PNG. This allows you to easily share or print the calendar in the future. It’s important to ensure that the digital file is high-quality and print-ready, in case you want to print it later.
Additional Resources for Creating Personalized Calendars
- Online tools:
- Canva: A graphic design platform that offers templates for creating custom calendars with your own photos.
- PicMonkey: A photo editing tool that allows you to add text, stickers, and effects to your photos for a unique calendar design.
- Flickr: A photo sharing website where you can find and use images from other users to create your personalized calendar.
- Mobile apps:
- Calendar by Google: A calendar app that lets you create custom calendars with your own photos and share them with others.
- Camera FV: A camera app that enables you to take high-quality photos that can be used for your personalized calendar.
- Adobe Lightroom: A photo editing app that provides a range of tools to enhance and edit your photos for a professional-looking calendar.
- Software:
- Microsoft Publisher: A desktop publishing software that offers templates for creating custom calendars with your own photos.
- Photoshop Elements: A photo editing software that provides a range of tools to edit and enhance your photos for a unique calendar design.
- iCal: A calendar app for Mac users that allows you to create custom calendars with your own photos and share them with others.
These resources offer a variety of tools and templates to help you create a personalized calendar with your own photos. Whether you prefer online tools, mobile apps, or software, there is a resource available to suit your needs and preferences. Experiment with different options to find the best method for creating your custom calendar.
FAQs
1. What software can I use to create a calendar with my own photos?
There are many software options available for creating a calendar with your own photos. Some popular options include Adobe InDesign, Microsoft Publisher, and Canva. These programs offer a variety of templates and design tools to help you create a professional-looking calendar.
2. Can I use a free online service to create my calendar?
Yes, there are many free online services that allow you to create a calendar with your own photos. Some popular options include Canva, Google Calendar, and Flickr. These services offer easy-to-use templates and design tools, making it simple to create a custom calendar without any design experience.
3. How do I choose the best photos for my calendar?
When choosing photos for your calendar, consider the overall theme or mood you want to convey. Choose photos that are well-lit and in focus, and avoid using blurry or low-quality images. You may also want to consider using a mix of landscape and portrait orientation photos to create a more visually interesting calendar.
4. How should I organize my calendar pages?
The organization of your calendar pages will depend on your personal preference and the size of your calendar. If you are creating a small calendar, you may choose to have one photo per page. If you are creating a larger calendar, you may choose to have multiple photos per page, or use the pages to divide the calendar into months or weeks.
5. How can I print my calendar once it’s complete?
Once you have created your calendar, you can print it using a home printer or a professional printing service. Be sure to check the printing requirements for your chosen printing method to ensure that your calendar prints correctly. If you are using a professional printing service, be sure to choose a high-quality paper and finishing options to create a professional-looking calendar.