Are you tired of the same old generic calendars? Do you want to create a personalized calendar that showcases your memories and photos? Look no further! With a DIY photo calendar, you can turn your favorite moments into a beautiful piece of art that you can display in your home or office. In this article, we’ll show you how to create a customized calendar using your own photos, so you can cherish those special memories all year round. Get ready to turn your snapshots into a stunning masterpiece that you’ll be proud to display.
Why Create a DIY Photo Calendar?
The Benefits of Personalized Calendars
Personalized calendars offer a unique way to commemorate special moments and keep track of important dates. By creating a DIY photo calendar, you can:
- Customize Your Calendar: Unlike store-bought calendars, you can choose the photos and moments that you want to display. This allows you to create a calendar that truly reflects your personal style and interests.
- Save Memories: A personalized calendar is a great way to preserve cherished memories. By including photos of significant events, you can keep those memories alive and easily accessible throughout the year.
- Organize Your Life: A personalized calendar can help you stay organized by keeping track of important dates, such as birthdays, anniversaries, and appointments. You can also use it to plan future events and make note of important deadlines.
- Showcase Your Creativity: Creating a DIY photo calendar is a fun and creative way to express your artistic side. You can experiment with different layouts, designs, and themes to create a unique and eye-catching calendar that reflects your personality.
- Make a Meaningful Gift: Personalized calendars make thoughtful and meaningful gifts for friends and family. By including photos of shared memories, you can create a keepsake that will be treasured for years to come.
How a DIY Photo Calendar Can Enhance Your Photography Skills
Creating a DIY photo calendar can help enhance your photography skills in several ways. Here are some of the benefits:
Develop Your Editing Skills
Working on a DIY photo calendar requires you to edit your pictures to make them suitable for printing. This process helps you improve your editing skills by familiarizing yourself with various software tools and techniques. You’ll learn how to adjust brightness, contrast, color balance, and sharpness to create high-quality images for your calendar.
Practice Composition and Visual Storytelling
A DIY photo calendar is an opportunity to showcase your best work and tell a story through your images. As you select and arrange your pictures, you’ll practice composition and visual storytelling. You’ll learn how to create a cohesive theme, balance elements in the frame, and use negative space effectively. These skills are transferable to other aspects of photography, such as creating portraits, landscapes, or still-life images.
Experiment with Printing and Materials
Printing your own photos gives you the chance to experiment with different paper types, printers, and finishing options. You’ll learn about the properties of various materials, such as glossy or matte finishes, and how they affect the final output. This hands-on experience will help you make informed decisions when choosing printing services for your professional work.
Create a Tangible Archive of Your Memories
Finally, creating a DIY photo calendar allows you to preserve your memories in a tangible form. Instead of keeping your photos stored on a digital device, you’ll have a physical calendar that you can display in your home or office. This will encourage you to curate your best work and treasure your favorite memories, which can help you grow as a photographer.
Gathering the Necessary Materials
A Printing Printer
Creating a personalized photo calendar requires a printing printer. The following are the details of the type of printer that is suitable for this project:
- Inkjet Printer: An inkjet printer is recommended for this project because it can produce high-quality photo prints. The printer should have a minimum resolution of 4800 x 1200 dpi for optimal results. Additionally, the printer should have an auto-duplex feature to enable easy printing on both sides of the paper.
- Printing Paper: A printing paper with a high resolution is necessary to achieve high-quality prints. A photo printing paper with a resolution of at least 2400 x 1200 dpi is recommended. This will ensure that the images printed on the calendar are clear and vibrant.
- Printing Ink: To achieve the best results, use a printing ink that is specifically designed for photo printing. This type of ink is typically more expensive than regular ink, but it will produce better quality prints. Additionally, make sure to use the appropriate ink cartridge for the printer to avoid any printing issues.
- Software: To print the calendar, you will need a software program that is compatible with your printer. Many printers come with built-in software, but if yours does not, you can download a program such as Adobe Photoshop or Microsoft Publisher. This software will allow you to create and edit the calendar before printing it.
By having the right printer, printing paper, ink, and software, you will be able to create a personalized photo calendar that you can treasure for years to come.
A Photo Editing Software
Creating a personalized photo calendar requires a reliable photo editing software to edit and enhance your images. There are many photo editing software options available, both free and paid, that can help you edit your photos for your DIY photo calendar. Some popular photo editing software options include:
- Adobe Photoshop: A professional-grade photo editing software that offers a wide range of tools and features for photo editing, retouching, and manipulation.
- GIMP: A free and open-source photo editing software that offers similar functionality to Adobe Photoshop.
- Canva: A graphic design platform that offers a range of templates and tools for creating visual content, including photo calendars.
- Lightroom: A photo management and editing software that allows you to organize, edit, and share your photos.
When choosing a photo editing software, consider your level of experience, the complexity of the project, and the specific features you need for your DIY photo calendar. Once you have selected your preferred software, you can begin editing and enhancing your photos for your personalized calendar.
Your Favorite Photos
When creating a personalized photo calendar, the first step is to gather your favorite photos. These can be photos of family, friends, pets, or any other meaningful moments that you want to cherish throughout the year. Here are some tips for selecting your photos:
- Choose photos that have good lighting and are in focus.
- Select photos that are relevant to the time of year, such as snowy winter scenes for December or blooming flowers for May.
- Consider using a mix of candid and posed photos to add variety to your calendar.
- Be sure to choose photos that have a special meaning to you and that you will enjoy looking at throughout the year.
Once you have selected your favorite photos, it’s time to move on to the next step in creating your personalized photo calendar.
Choosing the Right Photos for Your Calendar
Tips for Selecting the Best Photos
Creating a personalized photo calendar requires careful selection of the right images. Here are some tips to help you choose the best photos for your calendar:
- Consider the theme or purpose of the calendar: Think about what you want to achieve with your calendar. Is it for personal use, as a gift, or for decoration? The theme or purpose will help you choose photos that are relevant and meaningful.
- Choose photos that have good lighting and composition: Good lighting and composition are essential for producing high-quality photos. Look for photos that have good contrast, color balance, and are well-framed.
- Select photos that have high resolution: It’s important to choose photos that have high resolution to ensure that they print well and look good when enlarged. Check the resolution of your photos by looking at the file size or using photo editing software.
- Avoid clutter and distractions: Look for photos that have a clean and simple composition, without too much clutter or distractions. This will help your photos look more professional and polished.
- Consider the overall aesthetic: Think about the overall aesthetic you want to achieve with your calendar. Choose photos that complement each other and have a cohesive look and feel.
By following these tips, you can select the best photos for your DIY photo calendar, ensuring that it looks professional and personalized.
Considering the Theme and Color Scheme
When choosing the photos for your DIY photo calendar, it’s important to consider the theme and color scheme you want to achieve. This will help you create a cohesive and visually appealing calendar that represents your personal style and preferences. Here are some tips to keep in mind:
- Define your theme: Before selecting your photos, think about the overall theme you want to convey through your calendar. Do you want to focus on nature, travel, family, or something else? Once you have a clear idea of your theme, you can start looking for photos that fit that category.
- Consider the color scheme: The color scheme of your calendar can greatly impact its overall look and feel. If you have a specific color scheme in mind, try to select photos that complement that scheme. For example, if you want a warm and cozy color scheme, choose photos with warm colors like reds, oranges, and yellows. If you prefer a cool and crisp color scheme, choose photos with cool colors like blues, greens, and purples.
- Look for balance: When selecting your photos, it’s important to achieve a good balance between positive and negative space. Positive space refers to the main subject of the photo, while negative space refers to the background. You want to have a good mix of both to create a visually pleasing calendar.
- Use high-quality images: Using high-quality images will make your calendar look more professional and polished. If you have a lot of low-resolution or blurry photos, consider using them for other projects and select your best photos for your calendar.
- Mix it up: To keep your calendar interesting, try to mix up the types of photos you use. Use a combination of landscape, portrait, and action shots to create a diverse and engaging calendar.
Designing Your Calendar
Step-by-Step Guide to Designing Your DIY Photo Calendar
- Choose Your Photos
The first step in designing your DIY photo calendar is to choose the photos you want to use. Consider which photos are your favorites, or which ones capture special moments or memories. You can also consider grouping photos by theme or location to create a cohesive design. - Decide on the Layout
Next, decide on the layout of your calendar. You can choose to have a full-page photo for each month, or group multiple photos together on each page. Consider the size of your calendar and how much space you have to work with when deciding on the layout. - Create a Template
To make the design process easier, create a template for your calendar. This can be done using a word processing program or graphic design software. Make sure to include all the necessary elements, such as the month names and dates. - Add Text and Other Elements
Once you have your template, it’s time to add text and other elements to your calendar. This can include the month names, dates, and holidays. You can also add additional design elements such as borders, fonts, and colors to make your calendar more personalized. - Print and Assemble
Finally, it’s time to print and assemble your calendar. Depending on the size of your calendar, you may need to use a large-format printer or take it to a professional printing service. Once you have your printed pages, it’s time to assemble your calendar using a binding method of your choice. With a little bit of time and effort, you can create a personalized photo calendar that you’ll love.
Tips for Creating a Balanced and Visually Appealing Layout
When designing your photo calendar, it’s important to create a balanced and visually appealing layout. Here are some tips to help you achieve this:
- Choose a consistent color scheme: Select a color scheme that complements your photos and is consistent throughout the calendar. This will help create a cohesive look and make the calendar easy on the eyes.
- Use a grid layout: A grid layout is a great way to display multiple photos and create a balanced design. You can use a 3×3 or 4×4 grid, depending on the number of photos you want to include.
- Use white space effectively: White space is important in design because it helps create balance and contrast. Don’t be afraid to leave some space blank, as this will help your photos stand out and create a more visually appealing layout.
- Choose the right font: The font you choose can make a big difference in the overall look of your calendar. Choose a font that is easy to read and complements the overall design.
- Consider using a photo editor: If you want to take your calendar design to the next level, consider using a photo editor like Adobe Photoshop or Lightroom. These tools can help you adjust the color and brightness of your photos, and add effects like filters and textures.
By following these tips, you can create a personalized photo calendar that is both balanced and visually appealing.
Printing Your Calendar
Setting Up Your Printer and Paper
To start, gather all the necessary materials and tools for printing your calendar. First, you will need a printer that is compatible with the type of paper you will be using. Most home printers can handle standard 8.5 x 11-inch paper, but if you want to use a different size or type of paper, make sure your printer can handle it.
Next, choose the paper you will be using for your calendar. There are many options available, including photo paper, cardstock, and matte paper. Consider the finish you want for your calendar and choose a paper that will give you the desired result. For example, if you want a glossy finish, choose photo paper. If you want a more matte finish, choose matte paper.
Once you have chosen your paper, set up your printer according to the manufacturer’s instructions. Make sure the printer is clean and the paper tray is filled with the appropriate paper size. Check the ink or toner levels and replace them if necessary.
Once your printer is set up and the paper is loaded, you are ready to print your calendar. Depending on the size of your calendar and the number of pages, you may need to adjust the print settings. Make sure to select the appropriate page layout and orientation, and choose the print quality and color mode that best suits your needs.
Finally, carefully monitor the printing process to ensure that the calendar comes out looking exactly as you want it to. If you are using photo paper, make sure the colors are true and the images are sharp. If you are using cardstock, make sure the paper feeds smoothly through the printer and that the ink or toner levels are consistent.
By following these steps, you can set up your printer and paper to create a personalized photo calendar that you can enjoy all year round.
Printing Your DIY Photo Calendar
Printing your DIY photo calendar is an essential step in creating a personalized calendar with your own pictures. To ensure that your calendar turns out perfectly, there are a few things you should keep in mind when printing.
Size and Orientation
First, you need to decide on the size and orientation of your calendar. The most common sizes are 8×10 inches and 11×17 inches. You can choose the size that best suits your needs and preferences.
In terms of orientation, you can choose to print your calendar in portrait or landscape mode. If you plan to hang your calendar on a wall, you may want to choose a landscape orientation to make it easier to read.
Paper Type
Next, you need to choose the type of paper you will use to print your calendar. The most common paper types are matte and glossy.
Matte paper is a good choice if you want a more subtle finish. It is less reflective than glossy paper, which makes it easier to read in bright light. Matte paper is also less prone to fingerprints and smudges.
Glossy paper, on the other hand, is more reflective and can add a shine to your photos. It is a good choice if you want your calendar to have a more professional look.
Printer Settings
Finally, you need to make sure that you set your printer settings correctly. This includes choosing the correct color mode, selecting the appropriate paper size, and adjusting the print quality settings.
Make sure to use a high-quality printer that can handle photo printing. If you don’t have a photo printer, you can also take your files to a printing store and have them printed on photo paper.
Once you have made all these decisions, you can print your DIY photo calendar and enjoy the fruits of your labor.
Adding Special Touches to Your Calendar
Incorporating Quotes or Poems
If you’re looking to add a personal touch to your DIY photo calendar, incorporating quotes or poems can be a great way to do so. Here are some tips on how to add these special elements to your calendar:
- Choose quotes or poems that hold personal significance to you. This could be a favorite poem or a quote that inspires you.
- Consider the theme or mood you want to convey with your calendar. For example, if you’re creating a calendar to commemorate a special event or memory, choose a quote or poem that reflects that theme.
- Use a font that complements the overall design of your calendar. Consider using a calligraphy font for a more elegant look, or a handwritten font for a more casual feel.
- Place the quote or poem in a prominent location on the calendar page. This could be at the top or bottom of the page, or even as a background image.
- Don’t forget to include the author or source of the quote or poem. This is a great way to give credit where it’s due and showcase your appreciation for the work of others.
By incorporating quotes or poems into your DIY photo calendar, you can add a personal touch that will make your calendar truly unique and meaningful.
Adding Important Dates and Reminders
When creating your DIY photo calendar, it’s important to add important dates and reminders to make it even more useful and personalized. Here are some tips for adding important dates and reminders to your calendar:
Setting Reminders for Upcoming Events
One of the best ways to use your DIY photo calendar is to set reminders for upcoming events. This could include things like birthdays, anniversaries, holidays, or other important dates. To set reminders, simply write the date and a brief description of the event in the appropriate box on your calendar. You can also use a separate section of your calendar to list all of your upcoming events and reminders in one place.
Marking Special Occasions with Symbols or Images
Another way to add special touches to your calendar is to mark special occasions with symbols or images. For example, you could use a heart symbol to mark your anniversary or a snowflake to mark the first day of winter. You could also use images of your favorite things, like a picture of your pet or a photo of your favorite vacation spot. This will make your calendar even more personalized and enjoyable to look at.
Including Important Notes or To-Do Lists
Finally, you can also use your calendar to keep track of important notes or to-do lists. This could include things like grocery lists, reminders to pay bills, or notes about upcoming appointments. Simply write these items in the appropriate box on your calendar and check them off as you complete them. This will help you stay organized and on top of your tasks throughout the month.
By adding important dates, reminders, symbols, and images to your DIY photo calendar, you can create a personalized and useful tool for organizing your life. So get creative and have fun with it!
Displaying Your DIY Photo Calendar
Ideas for Hanging Your Calendar
Creating a personalized photo calendar is a great way to display your favorite memories throughout the year. When it comes to hanging your DIY photo calendar, there are several ideas to consider that can make your calendar stand out and become a beautiful decoration in your home.
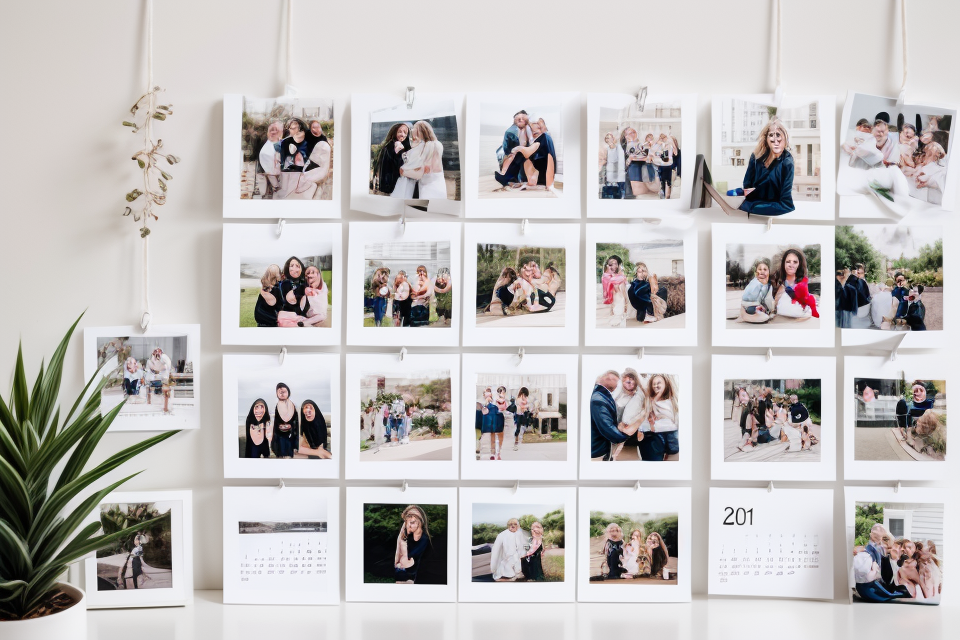
Option 1: Gallery Wall
A gallery wall is a popular way to display multiple pictures in one place. To create a gallery wall for your DIY photo calendar, choose a large, blank wall in your home and arrange your calendar pages in a grid pattern. This is a great way to showcase your photos and make a statement in your home decor.
Option 2: Picture Ledges
Picture ledges are a simple and stylish way to display your calendar pages. Simply attach your calendar pages to the ledges and place them on a table or shelf. This is a great option if you want to change up the location of your calendar frequently.
Option 3: Command Strips
Command strips are a convenient way to hang your calendar without damaging your walls. Simply attach your calendar pages to the strips and place them on any smooth surface. This is a great option if you want to move your calendar around frequently or if you rent your home and cannot make permanent changes to the walls.
Option 4: Wall Mounted Shelves
Wall mounted shelves are a practical and stylish way to display your calendar. Simply attach your calendar pages to the shelves and place them on a wall in your home. This is a great option if you want to create a cohesive look in your home decor and display other items along with your calendar.
Option 5: Floor to Ceiling Rails
Floor to ceiling rails are a unique way to display your calendar. Simply attach your calendar pages to the rails and place them on the floor or ceiling of a room. This is a great option if you want to create a dramatic statement in your home decor and make your DIY photo calendar the focal point of the room.
Sharing Your DIY Photo Calendar with Friends and Family
Creating a personalized photo calendar is a great way to showcase your favorite memories and share them with others. Once you have completed your DIY photo calendar, you may want to share it with friends and family. Here are some ways to do so:
Emailing Your DIY Photo Calendar
One of the easiest ways to share your DIY photo calendar is by emailing it to your loved ones. Simply attach the file to your email and send it to their inbox. This way, they can view your calendar at their convenience and admire your hard work and creativity.
Sharing Your DIY Photo Calendar on Social Media
Another way to share your DIY photo calendar is by posting it on social media platforms like Instagram, Facebook, or Twitter. You can take a picture of your calendar or upload the digital version and add a caption explaining the significance of the photos and memories you’ve included. This is a great way to connect with friends and family who live far away or to share your calendar with a wider audience.
Printing Your DIY Photo Calendar for Display
If you want to share your DIY photo calendar in a more tangible way, you can print it out and display it in your home or office. You can use a high-quality printer and choose a premium paper to ensure that your calendar looks professional and beautiful. You can also frame it for added impact.
By sharing your DIY photo calendar with friends and family, you can showcase your creativity and allow others to appreciate your memories and moments. Whether you choose to email, post on social media, or print and display it, there are many ways to share your DIY photo calendar and make it a cherished gift for those you love.
Tips for Preserving Your DIY Photo Calendar
Proper Storage Techniques
Proper storage techniques are essential to ensure that your DIY photo calendar remains in good condition for a long time. Here are some tips to keep your calendar looking its best:
- Avoid exposure to direct sunlight: Direct sunlight can cause fading and discoloration of your photos, so it’s best to store your calendar in a location that is not exposed to direct sunlight.
- Use acid-free materials: To prevent damage to your photos, use acid-free materials for storing your calendar. This includes acid-free paper, photo albums, and storage boxes.
- Handle your calendar with care: When handling your calendar, be gentle to avoid damaging the photos or the paper. Avoid bending or folding the pages, and always handle the calendar by the edges.
- Store it in a dry, cool place: High humidity and temperatures can cause damage to your calendar, so it’s best to store it in a dry, cool place. Avoid storing it in damp areas such as basements or attics.
- Consider digitizing your photos: While it’s great to have a physical copy of your photos, consider digitizing them as well. This will allow you to have a digital backup of your photos and prevent damage to the originals.
By following these proper storage techniques, you can ensure that your DIY photo calendar will remain a cherished keepsake for years to come.
How to Keep Your Calendar Looking New
- One of the most important things to keep in mind when it comes to preserving your DIY photo calendar is to avoid exposing it to direct sunlight. Direct sunlight can cause the colors to fade and the paper to become discolored and brittle.
- Another way to keep your calendar looking new is to handle it with care. Avoid bending or folding the pages, as this can cause creases and wrinkles that can make the calendar look worn and damaged.
- If you need to store your calendar, it’s best to do so in a cool, dry place. Avoid storing it in a damp or humid environment, as this can cause the pages to become warped and discolored.
- You can also use a calendar protector to keep your calendar looking new. A calendar protector is a clear plastic cover that fits over the calendar, providing a barrier against dust, dirt, and other debris that can damage the pages.
- Finally, if you notice any tears or rips in the pages of your calendar, it’s important to repair them as soon as possible. Use a strong adhesive, such as super glue, to seal the tear and prevent further damage.
Additional Resources for Enhancing Your Photography Skills
Improving your photography skills can significantly enhance the quality of your DIY photo calendar. Fortunately, there are numerous resources available to help you refine your abilities. Here are some valuable resources to consider:
Online Photography Courses
- Coursera: This platform offers a wide range of photography courses from renowned institutions like the Art Institute of Pittsburgh and the University of Colorado Boulder.
- Udemy: Udemy provides numerous photography courses that cater to different skill levels and areas of interest, such as landscape, portrait, and travel photography.
- Skillshare: Skillshare offers a variety of photography classes that cover various topics, including composition, lighting, and post-processing techniques.
Photography Books
- The Ansel Adams Guide to Photography: A classic book on photography by the renowned photographer Ansel Adams, offering insights into composition, exposure, and darkroom techniques.
- Bryan Peterson’s Understanding Photography Field Guide: This comprehensive guide covers various aspects of photography, including exposure, composition, and lighting.
- The Digital Photography Handbook: A valuable resource for photographers transitioning from film to digital, covering topics such as sensor size, ISO, and shutter speed.
Photography Blogs and YouTube Channels
- Digital Photography School: A popular blog that offers tips, tutorials, and articles on various aspects of photography, from beginner to advanced levels.
- The Slanted Lens: A blog focused on helping photographers improve their skills through informative articles, tutorials, and gear reviews.
- Peter McKinnon: A popular YouTube channel with in-depth videos on photography techniques, gear reviews, and creative process insights.
By taking advantage of these resources, you can develop your photography skills and create stunning DIY photo calendars that showcase your best memories.
Joining Online Communities and Forums
One effective way to learn how to make a DIY photo calendar that will last is by joining online communities and forums. These online groups provide a platform for people to share their experiences, knowledge, and ideas about various topics related to photo calendars. Here are some reasons why joining online communities and forums can be beneficial:
- Access to a wealth of information: Online communities and forums are great resources for finding information on various topics related to photo calendars. You can ask questions, read articles, and participate in discussions to learn more about the different techniques and methods for creating a DIY photo calendar.
- Connection with other DIY enthusiasts: By joining online communities and forums, you can connect with other DIY enthusiasts who share your passion for creating personalized photo calendars. You can share your own experiences, ask for advice, and learn from others who have gone through similar experiences.
- Opportunities for collaboration: Online communities and forums provide opportunities for collaboration among members. You can work together with other DIY enthusiasts to come up with new ideas, share resources, and create something truly unique and personalized.
Overall, joining online communities and forums is a great way to learn more about creating a DIY photo calendar that will last. You can access a wealth of information, connect with other DIY enthusiasts, and collaborate on new ideas and projects.
Attending Workshops and Photography Events
If you’re looking to improve your photography skills and create even more impressive DIY photo calendars, attending workshops and photography events can be a great way to learn new techniques and get inspired. Here are some tips for making the most of these opportunities:
- Research local photography events: Look for photography meetups, workshops, and conferences in your area. This can be a great way to connect with other photographers and learn from their experiences.
- Attend workshops and classes: Sign up for workshops and classes that focus on specific aspects of photography, such as lighting, composition, or editing. This can help you improve your skills and create more professional-looking calendars.
- Network with other photographers: Attend events and meetups where you can meet other photographers and build relationships. This can lead to collaborations, feedback, and new ideas for your DIY photo calendars.
- Keep learning: Stay up-to-date with the latest photography trends and techniques by reading books, blogs, and online resources. This can help you continually improve your skills and create even better calendars.
By attending workshops and photography events, you can improve your skills, learn new techniques, and connect with other photographers. This can help you create even more impressive DIY photo calendars and elevate your photography hobby to the next level.
FAQs
1. What is a DIY photo calendar?
A DIY photo calendar is a personalized calendar that you create using your own photos. It allows you to showcase your favorite memories and moments from throughout the year, making it a unique and special gift for yourself or others.
2. Can I use any photos for my DIY photo calendar?
Yes, you can use any photos you like for your DIY photo calendar. You can choose photos from your phone, computer, or even from a printed photo album. The more personal and meaningful the photos are, the more special your calendar will be.
3. How do I create a DIY photo calendar?
Creating a DIY photo calendar is a simple process. First, choose the photos you want to use and organize them in a way that makes sense for your calendar. Then, you can use a variety of tools and techniques to create your calendar, such as a calendar template, a photo printing service, or a custom calendar maker. You can also add captions or dates to your photos to make your calendar even more personalized.
4. What size should my DIY photo calendar be?
The size of your DIY photo calendar will depend on your personal preference and how you plan to use it. Some popular sizes include 8×10 inches, 11×14 inches, and 13×19 inches. Consider where you will be displaying your calendar and how much space you have available when choosing the size.
5. How much does it cost to create a DIY photo calendar?
The cost of creating a DIY photo calendar will depend on a variety of factors, such as the size of the calendar, the type of paper or material used, and any additional features or embellishments you choose. In general, you can create a basic DIY photo calendar for a relatively low cost, while more elaborate or customized calendars may be more expensive.
6. How long does it take to create a DIY photo calendar?
The time it takes to create a DIY photo calendar will depend on the complexity of the project and how much time you have available. A basic calendar can take as little as a few hours to create, while more elaborate or customized calendars may take several days or even weeks to complete. Be sure to plan ahead and allow enough time to create a high-quality calendar that you will be proud to display.