Are you looking for a unique and personalized way to display your favorite memories and moments? Why not create a customized picture calendar? It’s a great way to keep track of important dates and events while also showcasing your favorite photos. In this guide, we’ll walk you through the step-by-step process of creating a picture calendar that you’ll be proud to display in your home or office. So, get ready to bring your memories to life with a customized picture calendar!
Choose the Right Photos for Your Calendar
Consider the Theme
Seasonal and Holiday-Themed Photos
- Choose photos that reflect the seasons or holidays you want to celebrate throughout the year. For example, you can select pictures of blooming flowers for spring, colorful leaves for fall, or snow-covered landscapes for winter.
- Consider incorporating photos of holiday traditions, such as family gatherings, festive decorations, or special meals. This will add a personal touch to your calendar and make it more meaningful.
Personal Memories and Milestones
- Select photos that capture special moments and milestones in your life or the life of your loved ones. These can include birthdays, graduations, weddings, or the birth of a child.
- Including these photos in your calendar will create a visual reminder of the precious moments you want to cherish and celebrate throughout the year.
Travel and Adventure Photos
- If you enjoy traveling or embarking on adventures, choose photos that capture your experiences and memories from different destinations or activities.
- This can include scenic landscapes, iconic landmarks, or memorable moments from your travels. Incorporating these photos in your calendar will serve as a visual reminder of the amazing experiences you have had and inspire you to plan future adventures.
Ensure High-Quality Images
Creating a customized picture calendar requires selecting the right photos that will represent each month. When choosing images, it is crucial to ensure that they are of high quality to produce a professional-looking calendar. Here are some factors to consider when ensuring high-quality images for your calendar:
Resolution and File Size
The resolution of an image refers to the number of pixels it contains. For a calendar, it is recommended to use images with a resolution of at least 300 dpi (dots per inch) to ensure that the images are clear and sharp when printed. A high-resolution image will also help to minimize pixelation when the image is scaled up or down.
Additionally, it is important to consider the file size of the images. Large file sizes can slow down the processing time and may result in delays when uploading or downloading the images. To avoid this, it is recommended to optimize the images for web use before using them in your calendar. This can be done by compressing the images to reduce their file size without compromising their quality.
Color and Lighting
When selecting images for your calendar, it is important to consider the color and lighting of the images. Images with good color and lighting will help to make your calendar look more professional and visually appealing.
Images with good color and lighting should have a balanced color palette, with no excessive brightness or contrast. The lighting should be even and consistent throughout the image, without any harsh shadows or highlights. Additionally, it is recommended to use images that are in focus and have a clear subject matter, as this will help to make the calendar more readable and easier to use.
Prepare the Photos for Printing
Resize and Crop the Images
Aspect Ratio and Dimensions
Before you begin the process of resizing and cropping your images, it’s important to understand the aspect ratio and dimensions of your calendar. The aspect ratio for a calendar is typically 1:1, meaning that the width and height of the calendar are equal. However, you may also choose to use a 2:3 aspect ratio, which is more common for photographic prints.
It’s also important to determine the dimensions of your calendar. This will depend on the size of the paper you are using, as well as the final size of the calendar you want to create. For example, if you are using 8.5 x 11-inch paper, you may want to create a calendar that is 8 x 10 inches or 11 x 8 inches.
Crop and Adjust Margins
Once you have determined the aspect ratio and dimensions of your calendar, you can begin the process of resizing and cropping your images. This will involve using photo editing software such as Adobe Photoshop or GIMP to adjust the size and shape of your images.
To crop your images, you will need to select the tool that allows you to do so, and then use the handles to adjust the size and shape of the image. You may also need to adjust the margins of your images to ensure that they fit properly on the calendar.
It’s important to be careful when cropping your images, as you don’t want to lose any important details. Be sure to zoom in and inspect the image closely to ensure that you are not cutting off any important parts of the photo.
Additionally, you may want to consider adding a border to your calendar to help frame your images and give the calendar a more polished look. You can do this by adding a separate layer to your image and adjusting the size and color of the border.
Overall, resizing and cropping your images is an important step in creating a customized picture calendar. By understanding the aspect ratio and dimensions of your calendar, and using photo editing software to adjust the size and shape of your images, you can create a beautiful and unique calendar that you’ll love to display.
Optimize the Images for Print Quality
When preparing your photos for printing, it’s important to optimize them for print quality. This involves making sure that the images are of the highest possible quality and that they are properly formatted for printing. Here are some tips for optimizing your images for print quality:
Compression and File Format
When it comes to image compression, it’s important to find a balance between file size and image quality. Compressing images too much can result in a loss of detail and reduced image quality, while uncompressed images can be very large and take a long time to upload or print.
There are a few different file formats that you can use for printing, including JPEG, TIFF, and PNG. JPEG is the most common file format for photographs, as it compresses images very well while maintaining a high level of quality. TIFF is a high-quality file format that is often used for printing, as it preserves all of the details and colors in an image. PNG is a good choice for images with a lot of text or transparency, as it preserves the transparency of the image.
Color Mode and Brightness/Contrast
When preparing your images for printing, it’s important to make sure that the colors are correct and that the brightness and contrast are adjusted properly. The color mode of an image can affect how the colors appear when the image is printed. For example, an image in RGB mode may look very different when printed than an image in CMYK mode.
To ensure that your images look their best when printed, it’s important to adjust the brightness and contrast of the images. This can be done using photo editing software such as Adobe Photoshop or GIMP. By adjusting the brightness and contrast of your images, you can ensure that they look their best when printed.
Select a Calendar Template
Online Calendar Makers
In today’s digital age, creating a customized picture calendar has become much easier with the help of online calendar makers. These tools provide a variety of templates, designs, and features that allow you to create a unique and personalized calendar in just a few clicks. Here are some of the most popular online calendar makers:
Canva
Canva is a graphic design platform that offers a wide range of customizable templates for creating various types of designs, including calendars. It has a user-friendly interface and a vast library of images, fonts, and other design elements that you can use to create a beautiful picture calendar. With Canva, you can choose from various calendar templates, add your own photos, and customize the layout, colors, and fonts to match your style.
PicMonkey
PicMonkey is another online design tool that allows you to create customized picture calendars with ease. It offers a variety of calendar templates that you can edit and customize to fit your needs. You can add your own photos, change the colors and fonts, and add text to create a unique and personalized calendar. PicMonkey also offers a range of design tools and effects that you can use to enhance your calendar design.
Microsoft Publisher
Microsoft Publisher is a desktop publishing tool that allows you to create a variety of publications, including calendars. It offers a range of calendar templates that you can customize with your own photos, text, and design elements. With Microsoft Publisher, you can choose from a variety of layouts, fonts, and colors to create a professional-looking calendar that meets your needs. It also offers advanced design features, such as photo editing and effects, that you can use to enhance your calendar design.
Free Templates for Download
Microsoft Word
- Microsoft Word offers a variety of calendar templates that can be downloaded for free.
- To access these templates, open Microsoft Word and click on “Insert” in the top menu bar.
- Then, select “Template” and scroll through the available options to find a calendar template that suits your needs.
- You can also search for specific keywords like “photo calendar” or “custom calendar” to find templates that are better suited for your project.
Adobe InDesign
- Adobe InDesign is a professional design software that can be used to create customized picture calendars.
- To access the free calendar templates in InDesign, open the program and select “File” in the top menu bar.
- Then, select “New” and search for “calendar” in the search bar.
- This will bring up a list of available templates that you can download and use as a starting point for your own custom calendar.
Apple Pages
- Apple Pages is a word processing and page design application that comes pre-installed on Mac computers.
- To access the free calendar templates in Pages, open the program and select “Templates” in the top menu bar.
- Then, select “Pages” and scroll through the available options to find a calendar template that fits your needs.
Create Your Custom Picture Calendar
Follow the Template Guidelines
Creating a customized picture calendar can be a fun and rewarding project, but it’s important to follow the template guidelines to ensure that your calendar turns out looking professional and polished. Here are some tips to help you follow the template guidelines when creating your custom picture calendar:
Insert Photos and Arrange Them
One of the most important steps in creating a custom picture calendar is inserting your photos and arranging them in a way that looks visually appealing. Here are some tips to help you insert and arrange your photos:
- Choose high-quality photos that are in focus and well-lit.
- Arrange your photos in a way that tells a story or creates a theme.
- Use white space effectively to create balance and visual interest.
- Consider using a grid layout to make your calendar more organized and easy to read.
Add Text and Other Elements
In addition to your photos, you may also want to add text and other elements to your custom picture calendar. Here are some tips to help you add text and other elements:
- Choose a font that is easy to read and complements your photos.
- Use headings and subheadings to organize your calendar and make it easy to navigate.
- Use color to highlight important dates or create visual interest.
- Consider adding graphics or other visual elements to create a cohesive look.
By following these tips, you can create a customized picture calendar that is both beautiful and functional. Whether you’re creating a calendar for personal use or as a gift for someone special, a custom picture calendar is a thoughtful and unique way to celebrate the upcoming year.
Preview and Test Print
Creating a customized picture calendar is an exciting project that allows you to showcase your creativity while keeping track of important dates. Once you have designed your calendar, it’s crucial to preview and test print it before finalizing the product. Here’s why:
Check for Clarity and Color Accuracy
The first step in previewing and testing your printed calendar is to check for clarity and color accuracy. Make sure that the images and text are sharp and easy to read. Check for any distortion or blurriness that may have occurred during the printing process. It’s also essential to ensure that the colors are accurate and true to the original design.
To check for clarity and color accuracy, print a small version of your calendar using a printer with good quality settings. You can use a standard sheet of paper or a smaller version of the final product. Once you have printed the test page, hold it up to a light source to inspect for any issues.
Adjust and Repeat as Needed
If you notice any issues with the clarity or color accuracy, you can make adjustments to your design before printing the final product. For example, if the colors are not accurate, you can adjust the color settings in your design software to match the desired color scheme. If the images are blurry, you can resize them or adjust the resolution to improve the clarity.
It’s important to repeat the preview and test print process until you are satisfied with the results. Once you have finalized your design, print the final product using a high-quality printer with good color accuracy and clarity.
In summary, previewing and test printing your customized picture calendar is a crucial step in ensuring that the final product meets your expectations. By checking for clarity and color accuracy and making any necessary adjustments, you can create a beautiful and functional calendar that you can enjoy for years to come.
Finalize and Print Your Calendar
Choose Paper Type and Size
Once you have finished designing your custom picture calendar, it’s time to choose the paper type and size. The paper type and size will depend on your personal preference and the intended use of the calendar. Some popular paper types for calendars include matte, glossy, and cardstock. Matte paper is a good choice if you want a classic, understated look, while glossy paper adds a touch of shine and makes colors more vibrant. Cardstock is a thicker, more durable paper that is ideal for calendars that will be handled frequently or displayed in high-traffic areas.
When it comes to size, there are many options to choose from. The most common sizes for calendars are 8.5 x 11 inches, 11 x 17 inches, and 12 x 12 inches. Smaller sizes like 8.5 x 11 inches are great for desk calendars, while larger sizes like 11 x 17 inches and 12 x 12 inches are better for wall calendars. Consider the space where you will be displaying the calendar and choose a size that will fit comfortably without being too large or small.
Set Up Your Printer or Online Printing Service
After choosing the paper type and size, it’s time to set up your printer or online printing service. If you have a printer at home or in the office, make sure it is properly connected and that you have the necessary ink or toner cartridges. If you prefer to use an online printing service, search for a reputable company that offers high-quality printing and a variety of paper types and sizes.
When setting up your printer or online printing service, be sure to choose the correct paper type and size, as well as the orientation (landscape or portrait). It’s also important to ensure that your printer or printing service is capable of handling the resolution and quality of your custom picture calendar.
Print and Display Your Custom Picture Calendar
Once everything is set up, it’s time to print and display your custom picture calendar. Depending on your printer settings, you may need to adjust the print quality or color settings to ensure that your calendar looks its best. If you are using an online printing service, be sure to review the proofs and make any necessary adjustments before finalizing your order.
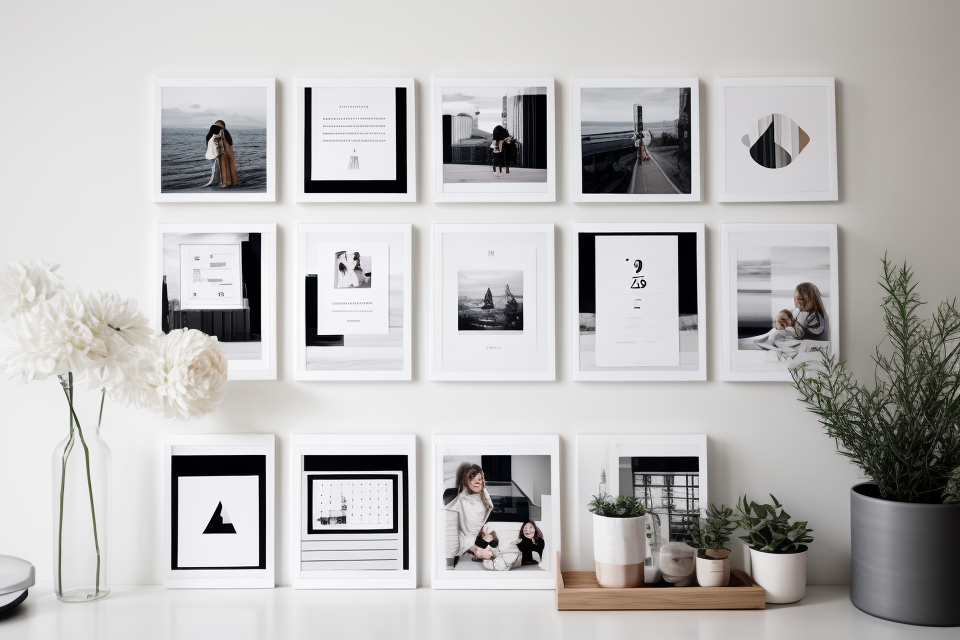
Once your calendar is printed, it’s time to display it. Depending on your chosen size and paper type, you may choose to display it on a wall, desk, or tabletop. Consider grouping it with other decorative items or using it as a standalone piece to add a personal touch to your space.
FAQs
1. What kind of pictures can I use to create a calendar?
You can use any kind of pictures to create a calendar, such as family photos, travel pictures, or even pictures of your favorite things. The important thing is that the pictures are high-quality and have a clear resolution.
2. How do I arrange the pictures on the calendar?
There are different ways to arrange the pictures on the calendar, depending on your preference. You can choose to have a different picture for each month, or you can have a picture that covers the entire year. You can also choose to have a theme for each month, such as having a beach picture for July and a snow picture for December.
3. What size should my calendar be?
The size of your calendar depends on your preference and how you plan to use it. If you want to hang it on the wall, you may want to choose a larger size, such as 12×12 inches. If you want to carry it with you, you may want to choose a smaller size, such as 8×8 inches.
4. Can I make a customized calendar with my own design?
Yes, you can make a customized calendar with your own design. There are many online tools and software that allow you to create your own design, such as Adobe Photoshop or Canva. You can choose your own colors, fonts, and images to create a unique and personalized calendar.
5. How do I print my calendar?
Once you have created your calendar, you can print it using a printer or a printing service. It’s important to choose a high-quality printer or printing service to ensure that your calendar turns out well. You can also choose to have your calendar printed on premium paper for a more professional and durable finish.